Showing posts with label cooking. Show all posts

Friday, February 22, 2013

Chicken Enchilada-like-entities

I am not of any sort of ethnic decent that would qualify me, in any way, to make enchiladas.  Therefore, these must be called "Enchilada-like-entities" much like cheez whiz must be spelled with a "z" for legal reasons.

However....

This is something that I did with chicken leftover from a rotisserie chicken.  (See my post:  If you're going to kill the chicken.... eat the chicken!)

What you'll need:  Some cooked chicken chopped up, a can of black beans, some frozen corn, an onion chopped up, hot sauce, salt, red pepper, chili powder, Mexican cheese blend, tortillas, enchilada sauce.
(Please remember that, as with most every recipe, I mix things up based on the way they taste.  I don't have measurements.  If you don't like things spicy, don't use hot sauce; if you like things really spicy, use lots; if you don't like corn, don't put it in there; if you like jalapenos, use them; put peanut butter in it!  Do what you like!)

Step one:  Chop up your leftover chicken.  (You could use canned too.)


Step Two:  Add chicken, black beans, onion, salt, pepper, hot sauce, a handful or two of the cheese, hot sauce, and corn to a bowl and mix together.

(This is before the black beans but was a better picture.)


Step Three:  Fill the tortillas with the mixture and roll up and place seam down in a glass casserole dish.


Step Four:  Cover the filled tortillas with enchilada sauce.


Step Five:  Cover everything with cheese.


Step Six:  Bake at 350 for about 30 minutes.  Your goal here is to heat it up and melt the cheese.


That's all folks!

Tuesday, February 19, 2013

If you're going to kill the chicken... EAT the chicken

I think everyone has added the pre-cooked rotisserie chicken from the grocery store to their standard "meals for the week" plan.  Maybe it's just me but I don't think so.  I used to get a whole chicken and cook it until I realized that it was often cheaper to buy the finished product.  Costco has a GIANT one, because it's Costco, for $4.99 and Whole Foods routinely has a "meal deal" where you can get a pound of potato salad or macaroni and cheese plus the rotisserie chicken for $7.99.

The point of this is that I have found that after the initial meal of roasted chicken a lot of my friends are just getting rid of the rest of the chicken.  THE HORROR!!

So I'm launching a campaign..... If you're going to buy the chicken... EAT the chicken.


Step One:  Pull the usable chicken off the bones.

The more broke I am, the more meals I can make out of one chicken so after we eat the initial meal I let it cool off and then I pull off all the meat and put it aside.  (As I add posts of recipes I use the extra chicken in, I will add them here.)

Enchiladas


Step Two:  The skin and bones go in the crock pot.

Generally when I do this I am also making soup and/or chicken salad or some other meal that involves veggies so I throw the celery leaves, carrot peals, onion skins in the crock pot too.  This is not necessary but if we are trying to make use of every part of our food we might as well use the veggie scraps too and it helps give a little extra flavor.


Step Three:  Cover it all with water.  I think I usually use about 8-12 cups depending on the size of the chicken.  The less water you use, the richer your stock will be.  You can always add more later.

Step Four:  Boil the heck out of it.  I put it on low in the crock pot overnight or all day long.


Step Five:  Once it has cooked strain the nasty chicken parts and old veggies out.  I like to use a colander with cheese cloth or a loosely woven tea towel over the top of a large bowl or pot.


Here is the leftover in the tea towel.  The good stuff is underneath this carnage.


What you are left with is the yummy stock.

Warning!!  If you taste it now you are going to think something is wrong.  It isn't going to taste like much of anything.  What you've made is stock, not broth.  Broth is, as far as I can figure, seasoned stock.  So if you want it to taste like broth, add salt!

Step Six:  Use this in whatever recipe you would use any other stock or broth.

Sunday, February 3, 2013

Bread Pudding

I don't eat things that don't taste good.  I mean, I'm southern so I eat it if it tastes good or if it will hurt someone's feelings if I don't eat it.  Or if my Dad says I have to.  Or if I told my son he has to eat it and I don't want to look like a hypocrite.  OK.  I prefer to eat things that taste good.  If it passes the "tastes good" test then it has to pass two more tests:  1.  Is it too difficult to make and 2.  Is it cheap.  Once those test have been passed then it becomes a dish we eat all the time.  Bread Pudding is one of those recipes.

Does it taste good?  Hell yes!

Is it difficult?  One bowl, one pan and in a pinch you can just do it all in the pan.

Is it cheap?  Because I usually have all the ingredients in the house and I'm rescuing bread that has gone stale it is usually free for me!


You will need:  One loaf stale bread (french bread or bakery bread is best... don't use sliced sandwich bread.), 3 cups whole milk, 1 stick butter (melted), 4 eggs, 1 1/2 cups of sugar, 2 tbs. vanilla, 3/4 tsp. nutmeg, 1/2 tsp. cinnamon, 1 box raisins (this can be substituted for apples or nuts or chocolate chips... whatever you want really)

Step One:  If you are buying some bread specifically to make this, cut it into cubes while it is still fresh and allow it to go stale.  Fresh (real) bread won't get moldy if you leave it out, it just gets stale.  I always make this when I've bought too much bread and it goes stale.  Once the whole loaf goes stale don't try to cut it.  Put it in a bag and hit it with a hammer.

Step Two:  Mix all of the ingredients, EXCEPT the bread, in a bowl.  (Sorry I forgot to take a picture of this step.)


Step Three:  Put the bread in the bowl with the liquid and mix around until it is all submerged.

Let this soak for an hour.  Mix occasionally to make sure all the bread is getting soaked.

While this is happening heat the oven to 350.


By the time it is ready to go into the pan it will be fairly "smushy".  That's when you know it is ready.


Step Four:  Pour into a pan.  A 13x9 is best.  Glass or metal or ceramic all work fine.  No need to grease the pan.

Bake on 350 for an hour.

When it comes out of the oven it should be brown and bubbly and smell WONDERFUL!!!

Enjoy!


Wednesday, January 30, 2013

Easy, Yummy Food: Red Beans and Rice

This is a staple in my house.  It's cheap, it's easy and it's really good!  I like to cook it on a Saturday when we are at home so I can have it on the stove and everyone can just grab some food as they want it.

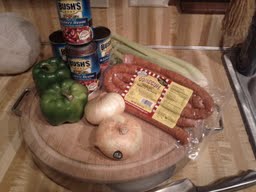
What you will need:  Your favorite brand of smoked sausage, a bell pepper or two, an onion or two, several ribs of celery, 4 cans of beans, salt, pepper, Emeril's seasoning, rice.

Note:  While I am certainly capable of following a recipe, I did not learn to cook that way.  My Dad taught me to cook and the way he does it is by the way it tastes, looks and feels.  If you have to have a recipe like "1 and 3/4 cup bell pepper" you will not get that from me.  I cook with what I have, what's easy to get, what I can make do with and what tastes good.  I may have to ask for some testimonials but I never get any complaints about my cooking so I believe the system is working.


Step One:  Dice your veggies and put in a bowl together.


Step Two:  Slice your sausage. Use the whole package.

Note:  I like to slice on an angle.  I seriously don't know why.  There is probably a reason that I learned at some point but I don't remember what it is.


Step Three:  Put your sausage in a big pot on medium to medium high heat.  Allow it to brown.

Note:  I like to use the same pot that I'm going to use to cook the whole thing.  


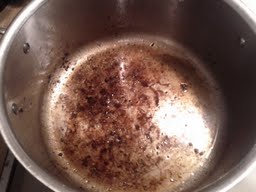
Step Three and a Half:  Remove the sausage and set aside.  You will be left with a little grease and brown stuff in the bottom of the pan.  Keep it there!  My dad calls the brown stuff "the goodness".  It is the BEST PART.  It is like the best part of the brown crispy parts of the sausage... just stuck to the pan. You want this in your beans!!

Note:  If you have more than about a tablespoon or two of grease you will want to get rid of some.  My sausage doesn't produce a lot.


See the bottom of the pan?
The goodness is not really gone!  It's
in the veggies now!!!
Step Four:  Dump HALF of your veggies in the pot ON TOP OF THE GREASE AND GOODNESS.  The moisture from the veggies will help loosen the goodness and it will get mixed up and make everything taste good.

Note:  The reason why you are putting half of the veggies in is that I like to put them in in stages.  1st stage is at the beginning to get caramelized (these will be completely mushy in the finished product); next is about halfway through cooking the beans (these will be soft at the end); last stage goes in about 10 minutes before starting to serve (these will still be fairly crunchy).

Cook these veggies on medium to medium high heat until they have begun to caramelize.  They will be brown and your house will smell wonderful.  One hint that I would give is to resist the urge to stir too often.  The longer they sit in one spot the more caramelized they will get.  Black throughout is not caramelized, it is burnt!!


Step Five:  Add the sausage back in and then add the beans.  (Dump in the whole can including the liquid.) Turn the heat way down.  They should be bubbling a tiny bit.  Season with salt, pepper and Emeril's.

Note:  Remember I don't measure anything so use your best judgement.  You will be seasoning and tasting so don't try to put too much in to begin with.

Stir and Cover and let cook.  The longer you can let it cook, the better it will taste.  Once you add the beans in it is OK to eat (meaning all the components have been cooked) but you want to try to let it simmer for an hour at the least.

Check it and stir it periodically.  Taste it when you do this and add more seasoning throughout the cooking process.

About halfway through your cooking time, add another 1/4 of the veggies (so that's half of what is left in the bowl).

Hint:  As it cooks the beans get mushy and help thicken the liquid.  I like to speed this process along by smashing some beans with the back of my spoon and stirring them in.

Hint:  If it seems like it is getting too thick add some water or chicken broth.

Step Six:  Cook white rice with whatever method you us to cook rice.

Step Seven:  Add last of veggies about ten minutes before serving.

Step Eight:  Serve beans over rice or all mixed in together. Yum!!!


Can you make it easier/quicker?  Yes! Remember that the way I showed above is the best way but there are several things you can do to cut prep and/or cooking time.  I have done all of these and always enjoy it.

  • Instead of chopping veggies, use frozen.  Almost every brand has a "seasoning blend" which has celery, green peppers and onions.  (Sometimes it has parsley too and thats fine!)
  • Brown the sausage and then dump everything into the crock and leave for the day on low.
  • Don't brown the sausage and then dump everything into the crock and leave for the day on low.
Enjoy!!


Monday, January 21, 2013

Inauguration Waffles

I promise I did not set off on a grocery expedition with the purpose of making red, white and blue waffles... it just sort of happened that way.

Benny was "feeling" the waffles
I asked Benny what he would eat for breakfast and he turned down everything I had so I told him he'd just have to starve.  He said he would eat waffles.  I said OK.  He said he would like plain waffles, strawberry waffles and blueberry waffles.  Shockingly I had all of these things in my house so I agreed but only if he would help me cook.

I'm going to get to my step by step instructions in a second but I want to admit something.  I could pretend like we woke up, got dressed and then had a perfect morning in the kitchen cooking and cleaning as we went.  It's even possible that I could have arranged the pictures in such a way that it looked like that really happened.  Instead I'd like to just leave you with a few of the things that were said/yelled so that you have an idea of what really went on this morning.

"Benny!  Stop petting the waffles!"
"Stop licking me!"
"Mom!!  I think the waffles are dying!!"
"For the love of God Benny don't do that with the knife!"
"Why are there strawberries in the carpet?"
"Benny!  Please don't touch my face with.... that."
"Mom!  I would never hurt a waffle on purpose."
"When you cook a blueberry it kind of looks like a squished roach.  That makes you not want to eat it? Well then just pretend like you are Indiana Jones and you have to."
"This is the funnest day ever.  Except not really.  That will probably be when I get a job or get married."
(I seriously got out a pad and wrote down the things we were saying to each other.

You will need:  (In addition to the ordinary things you have in your kitchen) a waffle iron, spray oil, eggs, baking powder, milk, oil, sugar, salt, flour, vanilla extract and whatever you want to mix in (we used blueberries and strawberries)

I used this recipe.  I doubled it because I wanted to have some frozen waffles for breakfast later this week.


Benny cracking an egg.  My sanity was well tested.
Step One:  Mix wet ingredients.
2 eggs
1 3/4 cups milk
1/2 cup vegetable oil
1/2 teaspoon vanilla extract
(This is the smaller batch.  I doubled this to get extra to freeze.)


Step Two:  Mix dry ingredients.
1 tbs white sugar
4 tsp baking powder
1/4 tsp salt
2 cups all purpose flour
(This is the smaller batch.  I doubled this to get extra to freeze.)


Step Three:  Mix wet and dry together

Step Four:  Mix in whatever extras you want to include.
Because we were making some plain, some with strawberries and some with blueberries we ended up splitting the batter into three separate batches so that we could add the different "mix-ins".

(Side note.  We like to cut up the strawberries small and smash the blueberries a little so that the "flavor" ends up all over the waffle.  That is Benny's explanation but I think he just likes to smash things.

Step Five:  Heat up your waffle iron.

Step Six:  Spray the waffle maker with spray oil.  (Make sure you spray the iron before each waffle.)


Step Seven:  Scoop, ladle, spoon or pour in batter.  Benny's method seemed to be of the "don't try this at home variety".

Step Eight:  Take it out.


Step Nine:  Eat


If you are freezing your waffles you should lay them out where they are not touching each other and freeze before sealing in bags or containers.  This way they won't be stuck together.  I actually had several layers separated by the parchment paper leftover from my failed craft the other night.  Win!


Tuesday, January 1, 2013

Here I am World!!!!

I've started a blog.  Woo!!  OK.  I'll admit I've done this before.  I had one where I ranted about things that got on my nerves.  That was kind of fun but sometimes I would have to edit myself so much not to piss everyone off that it stopped being entertaining.  I had one about romance novels (under a different name because it was dirty) and that was REALLY fun... especially when the authors were commenting on my posts.  It made me feel special.  But having to keep up with multiple passwords was really just beyond me.  So I'm going to try again.  I'd like to say this is a craft blog but I'm going to call it a "me" blog.  Chances are there will be a good mixture of rants about whatever is on my nerves at the moment, funny things my kid says/does, annoying things my husband says/does (I'm just kidding.... after 11 years of marriage he is always perfect), and random factoids.  BUT there will be lots of crafts.  I love crochet and really anything with yarn, sewing, painting, stenciling.  Also, probably a fair amount of recipes.  You'll also see some fun family/kid fun stuff.  So... hopefully you guys will subscribe and give me lots of positive vibes so I'll keep it up.  I promise to try to be entertaining, though I know I will fail at times... Remember I base my self esteem off others thinking I'm awesome!! ; )