Sunday, February 24, 2013

Reusable Snack Bags

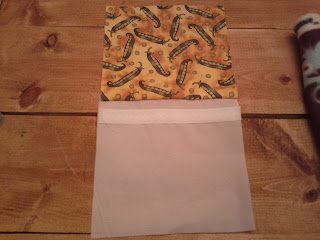
I love the idea of these bags.  I hate ziplock bags and try to use reusable containers for snacks instead.  A small glad ware container works really well but these are cuter.

I used some scrap fabric and some leftover nylon fabric so that the inside could be waterproof.


Step One:  Cut two outer pieces and two inner pieces each 7 inches by 7 inches.


Step Two:  Cut a 7 inch strip of both the hook and loop sides of sew-on velcro.


Step Three:  Pin the loop side of the velcro to the "right" side (the side that will be showing) of the nylon one inch down from top edge.  Do the same with the hook side of velcro on the other piece of nylon.


Step Four:  Sew the velcro down.  I used a straight stitch on the top and bottom and then a zig zag in the middle for a little extra strength.


Step Five:  Take the outside pieces of fabric.  Pin the nylon piece to the fabric piece with right sides facing.  (This means the velcro will be facing the right side of the fabric and you will be pinning the wrong side.)


Step Six:  Sew a straight line along the top edge of the fabric.  (The side parallel with the velcro.)  You will be sewing the inside piece to the outside piece.  Do this with all all four cut pieces so that you have two pieces with a nylon piece sewn to a fabric piece.

When you have sewn the edge and open the fabric you should have an "invisible" seam connecting the nylon and fabric.


Step Seven:  With right sides together pin both pieces together.  The trick here is to line the velcro up and everything else will fall into place after that.


Step Eight:  Sew around the perimeter of the rectangle leaving about an inch gap at the bottom of the fabric side.


Step Nine:  Push the fabric through the gap you've left, turning it so that the right side is out.


Step Ten:  Stitch the opening closed.


Voila!  Reusable snack bag!!


Friday, February 22, 2013

Chicken Enchilada-like-entities

I am not of any sort of ethnic decent that would qualify me, in any way, to make enchiladas.  Therefore, these must be called "Enchilada-like-entities" much like cheez whiz must be spelled with a "z" for legal reasons.

However....

This is something that I did with chicken leftover from a rotisserie chicken.  (See my post:  If you're going to kill the chicken.... eat the chicken!)

What you'll need:  Some cooked chicken chopped up, a can of black beans, some frozen corn, an onion chopped up, hot sauce, salt, red pepper, chili powder, Mexican cheese blend, tortillas, enchilada sauce.
(Please remember that, as with most every recipe, I mix things up based on the way they taste.  I don't have measurements.  If you don't like things spicy, don't use hot sauce; if you like things really spicy, use lots; if you don't like corn, don't put it in there; if you like jalapenos, use them; put peanut butter in it!  Do what you like!)

Step one:  Chop up your leftover chicken.  (You could use canned too.)


Step Two:  Add chicken, black beans, onion, salt, pepper, hot sauce, a handful or two of the cheese, hot sauce, and corn to a bowl and mix together.

(This is before the black beans but was a better picture.)


Step Three:  Fill the tortillas with the mixture and roll up and place seam down in a glass casserole dish.


Step Four:  Cover the filled tortillas with enchilada sauce.


Step Five:  Cover everything with cheese.


Step Six:  Bake at 350 for about 30 minutes.  Your goal here is to heat it up and melt the cheese.


That's all folks!

Tuesday, February 19, 2013

If you're going to kill the chicken... EAT the chicken

I think everyone has added the pre-cooked rotisserie chicken from the grocery store to their standard "meals for the week" plan.  Maybe it's just me but I don't think so.  I used to get a whole chicken and cook it until I realized that it was often cheaper to buy the finished product.  Costco has a GIANT one, because it's Costco, for $4.99 and Whole Foods routinely has a "meal deal" where you can get a pound of potato salad or macaroni and cheese plus the rotisserie chicken for $7.99.

The point of this is that I have found that after the initial meal of roasted chicken a lot of my friends are just getting rid of the rest of the chicken.  THE HORROR!!

So I'm launching a campaign..... If you're going to buy the chicken... EAT the chicken.


Step One:  Pull the usable chicken off the bones.

The more broke I am, the more meals I can make out of one chicken so after we eat the initial meal I let it cool off and then I pull off all the meat and put it aside.  (As I add posts of recipes I use the extra chicken in, I will add them here.)

Enchiladas


Step Two:  The skin and bones go in the crock pot.

Generally when I do this I am also making soup and/or chicken salad or some other meal that involves veggies so I throw the celery leaves, carrot peals, onion skins in the crock pot too.  This is not necessary but if we are trying to make use of every part of our food we might as well use the veggie scraps too and it helps give a little extra flavor.


Step Three:  Cover it all with water.  I think I usually use about 8-12 cups depending on the size of the chicken.  The less water you use, the richer your stock will be.  You can always add more later.

Step Four:  Boil the heck out of it.  I put it on low in the crock pot overnight or all day long.


Step Five:  Once it has cooked strain the nasty chicken parts and old veggies out.  I like to use a colander with cheese cloth or a loosely woven tea towel over the top of a large bowl or pot.


Here is the leftover in the tea towel.  The good stuff is underneath this carnage.


What you are left with is the yummy stock.

Warning!!  If you taste it now you are going to think something is wrong.  It isn't going to taste like much of anything.  What you've made is stock, not broth.  Broth is, as far as I can figure, seasoned stock.  So if you want it to taste like broth, add salt!

Step Six:  Use this in whatever recipe you would use any other stock or broth.

Monday, February 11, 2013

Ahhhh Bitchcraft.... I have not forgotten you!

Well I started out with the best intentions and then BAM!!  I was suddenly behind on all I wanted to share with you!!!  Let's blame the fact that my computer has been hateful and I bought a couple of really good books.  Nevertheless... Here are some things I've been doing and will soon be sharing with all my loyal fans.... both of them!

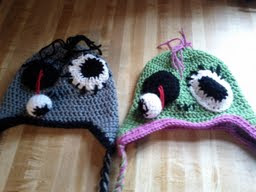
Crochet zombie hats

These have been a hit lately and I have finally written out a pattern.
Crochet Bearded Baby Hat

Including a link to this pattern and some other great crochet ideas.
Easy Chunky Crochet Baby Hat

This took about 20 minutes the other night and came out really cute.  Great pattern for the beginner!
Jambalaya

Step by step recipe

How to Kill a Chicken in 10 Easy Steps!

Not really.

How to get the most out of your store bought rotisserie chicken. 


Quick and Easy Dress Tutorial

Using an old dress as a pattern.

Chicken Coconut Soup

Yummy Yummy Thai recipe


If you have any thoughts on what you'd like to see first... SHARE!!


Wednesday, February 6, 2013

Yarn and Button Bracelet

Yes, these bracelets are technically crochet but don't let that scare you off if you don't know how.  You will need a crochet hook but you don't need to know how to crochet.  You only have to learn how to  "chain" if you don't already know the basic stitches.  Here is a good tutorial for how to create a chain stitch.

What you will need:  yarn in one or more colors, a button or two, a crochet hook (size is up to you but I would go with closer to an F,G or H hook), possibly a darning needle (or any needle large enough to fit your yarn if you can't thread it through the button holes with your fingers.)

Step One:  Tie a slip knot


Step Two:  Chain 200

This number is fairly arbitrary.  You should really just chain until you are happy with the length.  If you are using multiple colors you may want to make it a little shorter because after you put them all together it will get pretty fat.  If you are using only one color you might make it a little longer.  Different people crochet with different tensions so use the 200 number as a guideline but use your best judgement.

Step Three:  Fasten off and tie a loop in one end of the chain.

I did this by inserting my hook about 6 chains from the end, wrapping the end of the yarn around my hook and pulling it through.  Then I tied it off.


Step Four:  At the opposite end ad a button by threading the end of the yarn through the button holes.  I was able to do this with my fingers but if you have small button holes you may want to use a darning needle.

Step Five:  Repeat with as many colors as you like.


Finished!  Wrap it around your wrist and button.

I did mine in orange and blue... WAR EAGLE but had to do a hounds tooth and crimson one for my niece and as much as it pains me I will show both.


Sunday, February 3, 2013

Bread Pudding

I don't eat things that don't taste good.  I mean, I'm southern so I eat it if it tastes good or if it will hurt someone's feelings if I don't eat it.  Or if my Dad says I have to.  Or if I told my son he has to eat it and I don't want to look like a hypocrite.  OK.  I prefer to eat things that taste good.  If it passes the "tastes good" test then it has to pass two more tests:  1.  Is it too difficult to make and 2.  Is it cheap.  Once those test have been passed then it becomes a dish we eat all the time.  Bread Pudding is one of those recipes.

Does it taste good?  Hell yes!

Is it difficult?  One bowl, one pan and in a pinch you can just do it all in the pan.

Is it cheap?  Because I usually have all the ingredients in the house and I'm rescuing bread that has gone stale it is usually free for me!


You will need:  One loaf stale bread (french bread or bakery bread is best... don't use sliced sandwich bread.), 3 cups whole milk, 1 stick butter (melted), 4 eggs, 1 1/2 cups of sugar, 2 tbs. vanilla, 3/4 tsp. nutmeg, 1/2 tsp. cinnamon, 1 box raisins (this can be substituted for apples or nuts or chocolate chips... whatever you want really)

Step One:  If you are buying some bread specifically to make this, cut it into cubes while it is still fresh and allow it to go stale.  Fresh (real) bread won't get moldy if you leave it out, it just gets stale.  I always make this when I've bought too much bread and it goes stale.  Once the whole loaf goes stale don't try to cut it.  Put it in a bag and hit it with a hammer.

Step Two:  Mix all of the ingredients, EXCEPT the bread, in a bowl.  (Sorry I forgot to take a picture of this step.)


Step Three:  Put the bread in the bowl with the liquid and mix around until it is all submerged.

Let this soak for an hour.  Mix occasionally to make sure all the bread is getting soaked.

While this is happening heat the oven to 350.


By the time it is ready to go into the pan it will be fairly "smushy".  That's when you know it is ready.


Step Four:  Pour into a pan.  A 13x9 is best.  Glass or metal or ceramic all work fine.  No need to grease the pan.

Bake on 350 for an hour.

When it comes out of the oven it should be brown and bubbly and smell WONDERFUL!!!

Enjoy!