Yes, these bracelets are technically crochet but don't let that scare you off if you don't know how. You will need a crochet hook but you don't need to know how to crochet. You only have to learn how to "chain" if you don't already know the basic stitches. Here is a good tutorial for how to create a chain stitch.
What you will need: yarn in one or more colors, a button or two, a crochet hook (size is up to you but I would go with closer to an F,G or H hook), possibly a darning needle (or any needle large enough to fit your yarn if you can't thread it through the button holes with your fingers.)
Step One: Tie a slip knot
Step Two: Chain 200
This number is fairly arbitrary. You should really just chain until you are happy with the length. If you are using multiple colors you may want to make it a little shorter because after you put them all together it will get pretty fat. If you are using only one color you might make it a little longer. Different people crochet with different tensions so use the 200 number as a guideline but use your best judgement.
Step Three: Fasten off and tie a loop in one end of the chain.
I did this by inserting my hook about 6 chains from the end, wrapping the end of the yarn around my hook and pulling it through. Then I tied it off.
Step Four: At the opposite end ad a button by threading the end of the yarn through the button holes. I was able to do this with my fingers but if you have small button holes you may want to use a darning needle.
Step Five: Repeat with as many colors as you like.
Finished! Wrap it around your wrist and button.
I did mine in orange and blue... WAR EAGLE but had to do a hounds tooth and crimson one for my niece and as much as it pains me I will show both.
Showing posts with label art. Show all posts
Wednesday, February 6, 2013
Yarn and Button Bracelet
Labels:
activities,
activity,
alabama,
art,
arts and crafts,
auburn,
bracelet,
button,
craft,
crafting,
crochet,
yarn
Saturday, January 19, 2013
Crafting FAIL
We'd all like to assume we are super women/men.... people. I'm lucky because in my case I actually am. However....
I had some grand plans to put together wax paper chandelier that MULTIPLE people have posted on their blogs. I'm sure that I could eventually figure out how to do this properly and maybe I just completely overestimated the amount of patience I have but it did NOT turn out well. At all.
My niece came over to help, my sister to watch, my nephew to entertain Benny.
So we were supposed to take 3 sheets of wax paper between two sheets of parchment paper and iron them together. I had Alex tear all of the parchment paper and wax paper into strips. Just like the blogs suggest.
We were still feeling pretty good about ourselves so here she is.... happy that she has accomplished successfully tearing eleventy bajillion sheets of wax paper.
Then things began to get more difficult as I realized I had lost my iron. It goes downhill from here.
After my neighbor let me borrow an iron and we get back to work I started the process of ironing only to realize that we didn't need to tear the entire box of parchment paper into strips. You really just need two because you can reuse them because the parchment paper is just there to keep you from screwing up your iron. (Don't worry Julie, we didn't screw up your iron.)
Whatever... Onward and upwards!!! We start ironing things together and I hand them off to Alex. Here's where we run into the major problem....
The whole punch I bought for $20 (I mean I had a coupon and everything so I didn't actually pay that much) SUCKS MONKEYS!!
This is the best looking circle we got. I know that might not seem like it's that bad but you have to realize it took us twenty minutes to get ONE that looked this good. The chandelier takes about 10 million. I just don't have that kind of time in my life.
This is how we felt.
But Nathan had brought home beer from Hop City.
Then we got out the yarn
I had some grand plans to put together wax paper chandelier that MULTIPLE people have posted on their blogs. I'm sure that I could eventually figure out how to do this properly and maybe I just completely overestimated the amount of patience I have but it did NOT turn out well. At all.
My niece came over to help, my sister to watch, my nephew to entertain Benny.
So we were supposed to take 3 sheets of wax paper between two sheets of parchment paper and iron them together. I had Alex tear all of the parchment paper and wax paper into strips. Just like the blogs suggest.We were still feeling pretty good about ourselves so here she is.... happy that she has accomplished successfully tearing eleventy bajillion sheets of wax paper.
Then things began to get more difficult as I realized I had lost my iron. It goes downhill from here.
After my neighbor let me borrow an iron and we get back to work I started the process of ironing only to realize that we didn't need to tear the entire box of parchment paper into strips. You really just need two because you can reuse them because the parchment paper is just there to keep you from screwing up your iron. (Don't worry Julie, we didn't screw up your iron.)
Whatever... Onward and upwards!!! We start ironing things together and I hand them off to Alex. Here's where we run into the major problem....
The whole punch I bought for $20 (I mean I had a coupon and everything so I didn't actually pay that much) SUCKS MONKEYS!!
This is the best looking circle we got. I know that might not seem like it's that bad but you have to realize it took us twenty minutes to get ONE that looked this good. The chandelier takes about 10 million. I just don't have that kind of time in my life.This is how we felt.
But Nathan had brought home beer from Hop City.
Then we got out the yarn
Labels:
activities,
activity,
alabama,
art,
arts and crafts,
awesome,
beer,
blog,
craft,
crafting,
crafting fail,
crafts,
fail,
failure,
Hop City,
wax paper,
wax paper chandelier
Thursday, January 10, 2013
Monster Jean Patch
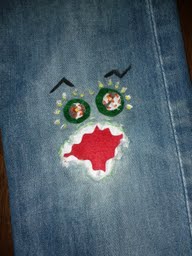
Jeans are expensive. Kids are not as willing to wear patches in their jeans anymore.... were they ever willing??? Anyway... I discovered last year that Benny would wear a patched pair of jeans if I did something fun to it. This is my "monster" jean patch.
The thing that's nice about this is that as long as you have some sort of fabric scraps laying around the house and some basic sewing supplies, the cost is $0!!! Right up my alley!!!
Step One: Clean up the hole by cutting the strings from in/around it.
Step Two: Cut a piece of fabric slightly larger than the hole
Step Four: Sew around the hole (I decided to use bright green but you can use a blue or something that will blend in with the jeans) making sure to secure both the fabric and the rick rack in place.
I did these after I got home from work while my husband was cooking dinner. (Don't get too excited he decided to cook Macaroni and Cheese with Sausage but it's the thought that counts.) My point is that they are quick and easy and even though these didn't turn out, in my opinion, as good as the last ones did... they still saved a pair of jeans that would have otherwise been sent to Goodwill. Hopefully we will get a few more wears out of these before I have to buy some more.
The thing that's nice about this is that as long as you have some sort of fabric scraps laying around the house and some basic sewing supplies, the cost is $0!!! Right up my alley!!!
Supplies: A pair of jeans with a hole in the knee, fabric scraps, scissors, needle, thread (I decided that it needed something extra and I ended up using fabric paint as well but it's really up to you if you want to use that or not.)
Step One: Clean up the hole by cutting the strings from in/around it.
Step Two: Cut a piece of fabric slightly larger than the hole
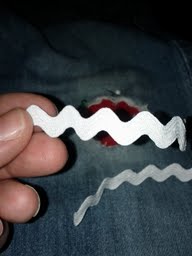
Step Three: Put the fabric under the hole and add some rick rack to look like teeth and pin in place.
Step Four: Sew around the hole (I decided to use bright green but you can use a blue or something that will blend in with the jeans) making sure to secure both the fabric and the rick rack in place.
Step Five: Using fabric, buttons, felt, etc... add some eyes.
Step Six: I used orange embroidery floss to secure the eyes in place and add some more color. You can use a matching color of thread. That's the fun thing about this... it's really completely up to you!
Step Seven: The last time I made these I stopped at step six but this time I thought it looked a little too plain so I decided to paint a little something extra with fabric paint.
When I was done I thought maybe I should have stopped at step six but Benny liked them so I have decided to count these as a crafting "win".
I did these after I got home from work while my husband was cooking dinner. (Don't get too excited he decided to cook Macaroni and Cheese with Sausage but it's the thought that counts.) My point is that they are quick and easy and even though these didn't turn out, in my opinion, as good as the last ones did... they still saved a pair of jeans that would have otherwise been sent to Goodwill. Hopefully we will get a few more wears out of these before I have to buy some more.
Labels:
activities,
activity,
alabama,
art,
arts and crafts,
birmingham,
clothes,
craft,
crafting,
crafts,
fabric,
fabric paint,
family,
kids,
mom,
monster,
patch,
sewing
Tuesday, January 8, 2013
Bulletin Board-a-palooza!
I always think I'm pretty lucky to have my job. One of my favorite things is sitting at my desk with scissors, construction paper and glue making arts and crafts and Bulletin Board Decorations.
I'm always looking for ideas.
I made one today that I just had to share and thought I'd post a few of my favorites while I was at it.
Why Did the Chicken Cross the Road?Some answers:
"To git sum chiken"
"I have no idea"
"Because he wanted to get smooshed by a truck"
Animal Alphabet
I was really proud of this one. We made every animal out of construction paper. My boss's boss came in from St. Louis and thought my owl was an octopus. It has been about 6 months and I still can't get over it.
Guess Who
All of the staff made a butterfly that had something to do with their personality. This was probably my favorite bulletin board ever! We all had so much fun with this one.
Just a few more that I like....
Labels:
art,
arts and crafts,
bulletin boards,
construction paper,
crafts,
kids,
school
Subscribe to:
Posts (Atom)