Yes, these bracelets are technically crochet but don't let that scare you off if you don't know how. You will need a crochet hook but you don't need to know how to crochet. You only have to learn how to "chain" if you don't already know the basic stitches. Here is a good tutorial for how to create a chain stitch.
What you will need: yarn in one or more colors, a button or two, a crochet hook (size is up to you but I would go with closer to an F,G or H hook), possibly a darning needle (or any needle large enough to fit your yarn if you can't thread it through the button holes with your fingers.)
Step One: Tie a slip knot
Step Two: Chain 200
This number is fairly arbitrary. You should really just chain until you are happy with the length. If you are using multiple colors you may want to make it a little shorter because after you put them all together it will get pretty fat. If you are using only one color you might make it a little longer. Different people crochet with different tensions so use the 200 number as a guideline but use your best judgement.
Step Three: Fasten off and tie a loop in one end of the chain.
I did this by inserting my hook about 6 chains from the end, wrapping the end of the yarn around my hook and pulling it through. Then I tied it off.
Step Four: At the opposite end ad a button by threading the end of the yarn through the button holes. I was able to do this with my fingers but if you have small button holes you may want to use a darning needle.
Step Five: Repeat with as many colors as you like.
Finished! Wrap it around your wrist and button.
I did mine in orange and blue... WAR EAGLE but had to do a hounds tooth and crimson one for my niece and as much as it pains me I will show both.
Showing posts with label activity. Show all posts
Showing posts with label activity. Show all posts
Wednesday, February 6, 2013
Yarn and Button Bracelet
Labels:
activities,
activity,
alabama,
art,
arts and crafts,
auburn,
bracelet,
button,
craft,
crafting,
crochet,
yarn
Saturday, January 19, 2013
Crafting FAIL
We'd all like to assume we are super women/men.... people. I'm lucky because in my case I actually am. However....
I had some grand plans to put together wax paper chandelier that MULTIPLE people have posted on their blogs. I'm sure that I could eventually figure out how to do this properly and maybe I just completely overestimated the amount of patience I have but it did NOT turn out well. At all.
My niece came over to help, my sister to watch, my nephew to entertain Benny.
 So we were supposed to take 3 sheets of wax paper between two sheets of parchment paper and iron them together. I had Alex tear all of the parchment paper and wax paper into strips. Just like the blogs suggest.
We were still feeling pretty good about ourselves so here she is.... happy that she has accomplished successfully tearing eleventy bajillion sheets of wax paper.
Then things began to get more difficult as I realized I had lost my iron. It goes downhill from here.
After my neighbor let me borrow an iron and we get back to work I started the process of ironing only to realize that we didn't need to tear the entire box of parchment paper into strips. You really just need two because you can reuse them because the parchment paper is just there to keep you from screwing up your iron. (Don't worry Julie, we didn't screw up your iron.)
Whatever... Onward and upwards!!! We start ironing things together and I hand them off to Alex. Here's where we run into the major problem....
The whole punch I bought for $20 (I mean I had a coupon and everything so I didn't actually pay that much) SUCKS MONKEYS!!
 This is the best looking circle we got. I know that might not seem like it's that bad but you have to realize it took us twenty minutes to get ONE that looked this good. The chandelier takes about 10 million. I just don't have that kind of time in my life.
This is how we felt.
But Nathan had brought home beer from Hop City.
Then we got out the yarn
I had some grand plans to put together wax paper chandelier that MULTIPLE people have posted on their blogs. I'm sure that I could eventually figure out how to do this properly and maybe I just completely overestimated the amount of patience I have but it did NOT turn out well. At all.
My niece came over to help, my sister to watch, my nephew to entertain Benny.
 So we were supposed to take 3 sheets of wax paper between two sheets of parchment paper and iron them together. I had Alex tear all of the parchment paper and wax paper into strips. Just like the blogs suggest.
We were still feeling pretty good about ourselves so here she is.... happy that she has accomplished successfully tearing eleventy bajillion sheets of wax paper.
Then things began to get more difficult as I realized I had lost my iron. It goes downhill from here.
After my neighbor let me borrow an iron and we get back to work I started the process of ironing only to realize that we didn't need to tear the entire box of parchment paper into strips. You really just need two because you can reuse them because the parchment paper is just there to keep you from screwing up your iron. (Don't worry Julie, we didn't screw up your iron.)
Whatever... Onward and upwards!!! We start ironing things together and I hand them off to Alex. Here's where we run into the major problem....
The whole punch I bought for $20 (I mean I had a coupon and everything so I didn't actually pay that much) SUCKS MONKEYS!!
 This is the best looking circle we got. I know that might not seem like it's that bad but you have to realize it took us twenty minutes to get ONE that looked this good. The chandelier takes about 10 million. I just don't have that kind of time in my life.
This is how we felt.
But Nathan had brought home beer from Hop City.
Then we got out the yarn
Labels:
activities,
activity,
alabama,
art,
arts and crafts,
awesome,
beer,
blog,
craft,
crafting,
crafting fail,
crafts,
fail,
failure,
Hop City,
wax paper,
wax paper chandelier
Saturday, January 12, 2013
Fried Dough and Various Kinds of Sugar
Quick and easy (and cheap) doughnuts. My family was ridiculously impressed and quiet for at least 30 minutes while they ate.
What you will need: oil, sugar, cinnamon, powdered sugar, raw biscuits, a deep skillet, tongs, candy thermometer (this is optional but it gives you a slightly better idea of the temperature to have your oil)

Step One: Heat the oil to about 240. You want to have it hot enough to brown the biscuits but not so hot that they get too brown before the dough it cooked.
(Please don't make fun of my candy thermometer. I know all of the numbers have worn away but I can still see them if I look very closely.)
Step Two: Cut each biscuit into 4 pieces. This is what worked well for me. If you'd like to have them look like doughnuts you can punch a circle out of the middle of each biscuit or you could use cookie cutters to cut shapes you like. Remember they are going to puff up a bit and might lose some of their shape.
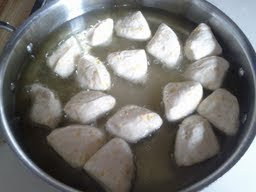
Step Three: Plop the dough in the oil. Leave on one side about 1-2 minutes. They will start to get brown. Once one side is brown flip them over and let the other side fry for another 1-2 minutes.

This is what they look like when you flip them over.
Step Four: While they are cooking put powdered sugar in a bowl and mix refined sugar with cinnamon in another bowl.
Step Five: As you pull them out of the oil immediately roll them around in the sugar.
This is the cinnamon and sugar. Obviously I did the same thing with the powdered sugar but I couldn't get the picture to turn the other way and I was being mildly OCD about it. So I deleted it.
Step Six: Put them on a paper towel or a cooling rack. I use the Alton Brown method of putting paper towels down and then putting a cooling rack on top upside down so some of the oil drains but they don't sit in the oil.
DONE!!! OK this is a horrible picture but I was having to dodge hands in the picture. OK... they were my hands but it was hot fried dough covered in sugar so you can't blame me.
Recap: Writing this post took longer than the entire process of making these. Everyone loved them. They were absolutely unhealthy. The only thing I had to purchase was a can of Grands (which was on sale for $1.00 at Publix this week) and everything else I already had in my cabinet.
This one will go in the "Pinterest Win" category.
What you will need: oil, sugar, cinnamon, powdered sugar, raw biscuits, a deep skillet, tongs, candy thermometer (this is optional but it gives you a slightly better idea of the temperature to have your oil)

Step One: Heat the oil to about 240. You want to have it hot enough to brown the biscuits but not so hot that they get too brown before the dough it cooked.
(Please don't make fun of my candy thermometer. I know all of the numbers have worn away but I can still see them if I look very closely.)
Step Two: Cut each biscuit into 4 pieces. This is what worked well for me. If you'd like to have them look like doughnuts you can punch a circle out of the middle of each biscuit or you could use cookie cutters to cut shapes you like. Remember they are going to puff up a bit and might lose some of their shape.
Step Three: Plop the dough in the oil. Leave on one side about 1-2 minutes. They will start to get brown. Once one side is brown flip them over and let the other side fry for another 1-2 minutes.

This is what they look like when you flip them over.
Step Four: While they are cooking put powdered sugar in a bowl and mix refined sugar with cinnamon in another bowl.
Step Five: As you pull them out of the oil immediately roll them around in the sugar.
This is the cinnamon and sugar. Obviously I did the same thing with the powdered sugar but I couldn't get the picture to turn the other way and I was being mildly OCD about it. So I deleted it.
Step Six: Put them on a paper towel or a cooling rack. I use the Alton Brown method of putting paper towels down and then putting a cooling rack on top upside down so some of the oil drains but they don't sit in the oil.
DONE!!! OK this is a horrible picture but I was having to dodge hands in the picture. OK... they were my hands but it was hot fried dough covered in sugar so you can't blame me.
Recap: Writing this post took longer than the entire process of making these. Everyone loved them. They were absolutely unhealthy. The only thing I had to purchase was a can of Grands (which was on sale for $1.00 at Publix this week) and everything else I already had in my cabinet.
This one will go in the "Pinterest Win" category.
Labels:
activities,
activity,
alabama,
birmingham,
biscuits,
dough,
doughnuts,
family,
fried,
quick,
quick and easy,
recipe
Thursday, January 10, 2013
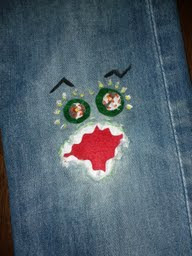
Monster Jean Patch
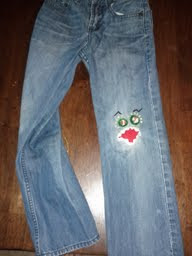
Jeans are expensive. Kids are not as willing to wear patches in their jeans anymore.... were they ever willing??? Anyway... I discovered last year that Benny would wear a patched pair of jeans if I did something fun to it. This is my "monster" jean patch.
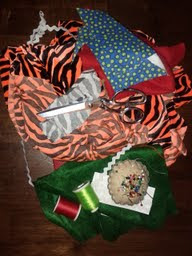
The thing that's nice about this is that as long as you have some sort of fabric scraps laying around the house and some basic sewing supplies, the cost is $0!!! Right up my alley!!!
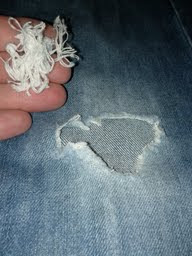
Step One: Clean up the hole by cutting the strings from in/around it.
Step Two: Cut a piece of fabric slightly larger than the hole
 Step Four: Sew around the hole (I decided to use bright green but you can use a blue or something that will blend in with the jeans) making sure to secure both the fabric and the rick rack in place.
I did these after I got home from work while my husband was cooking dinner. (Don't get too excited he decided to cook Macaroni and Cheese with Sausage but it's the thought that counts.) My point is that they are quick and easy and even though these didn't turn out, in my opinion, as good as the last ones did... they still saved a pair of jeans that would have otherwise been sent to Goodwill. Hopefully we will get a few more wears out of these before I have to buy some more.
The thing that's nice about this is that as long as you have some sort of fabric scraps laying around the house and some basic sewing supplies, the cost is $0!!! Right up my alley!!!
Supplies: A pair of jeans with a hole in the knee, fabric scraps, scissors, needle, thread (I decided that it needed something extra and I ended up using fabric paint as well but it's really up to you if you want to use that or not.)
Step One: Clean up the hole by cutting the strings from in/around it.
Step Two: Cut a piece of fabric slightly larger than the hole
Step Three: Put the fabric under the hole and add some rick rack to look like teeth and pin in place.
 Step Four: Sew around the hole (I decided to use bright green but you can use a blue or something that will blend in with the jeans) making sure to secure both the fabric and the rick rack in place.
Step Five: Using fabric, buttons, felt, etc... add some eyes.
Step Six: I used orange embroidery floss to secure the eyes in place and add some more color. You can use a matching color of thread. That's the fun thing about this... it's really completely up to you!
Step Seven: The last time I made these I stopped at step six but this time I thought it looked a little too plain so I decided to paint a little something extra with fabric paint.
When I was done I thought maybe I should have stopped at step six but Benny liked them so I have decided to count these as a crafting "win".
I did these after I got home from work while my husband was cooking dinner. (Don't get too excited he decided to cook Macaroni and Cheese with Sausage but it's the thought that counts.) My point is that they are quick and easy and even though these didn't turn out, in my opinion, as good as the last ones did... they still saved a pair of jeans that would have otherwise been sent to Goodwill. Hopefully we will get a few more wears out of these before I have to buy some more.
Labels:
activities,
activity,
alabama,
art,
arts and crafts,
birmingham,
clothes,
craft,
crafting,
crafts,
fabric,
fabric paint,
family,
kids,
mom,
monster,
patch,
sewing
Monday, January 7, 2013
The Martian Death Flu Mario Kart Grudge Match
Whenever someone in my house gets really sick I always call it the Martian Death Flu. Dave Barry, the best humor columnist ever, wrote an article called Molecular Homicide that summed up my feelings on any really horrible illness:
"We have the flu. I don't know if this particular strain has an official name, but if it does, it must be something like "Martian Death Flu." You may have had it yourself. The main symptom is that you wish you had another setting on your electric blanket, up past HIGH, that said ELECTROCUTION."
If you haven't ever read anything written by him you MUST!!!
Anyway, while we were all sick with MDF it just happened that it was Benny's Christmas Vacation. I had a whole week off and felt all of this "working mom guilt" piling up on me because the best I could manage while we had all this time together was to not die in front of him. After a few days of my only accomplishment being staying alive we both started to get a little bored and so was born the "Martian Death Flu Mario Kart Grudge Match" Benny vs. Mommy. We played every race on Mario Kart 4 times. If raising my child from birth, feeding him, clothing him, taking him on trips, disciplining him with love, telling him he was perfect even when he was not, being patient with him, etc... etc... did not prove that I am a good mother... this did. Seriously.
So we played all 32 races 4 times each and kept track of the results. I made Benny keep a chart and add all the points. We ended up with a poster. I'm not sure exactly what method Benny was using for his charting purposes but I've convinced myself that it was educational. There was adding and writing and spelling and reading a chart. By the end of it I was feeling pretty impressed with myself.
Benny is already talking about next year's "Grudge Match". He tells me that there is always the chance that I could do a little better if I practice a little harder.
So I guess the take away in all of this is that things don't have to go as planned always. As long as you show up your kids are going to appreciate it. Also, flu shots don't do anything.
One more Dave Barry quote. Just because I can.
"There has been a mound of blankets on my wife's side of the bed for several days now, absolutely motionless except that it makes occasional efforts to spit into a Kleenex. I think it might be my wife, but the only way to tell for sure would be to prod it, which I wouldn't do even if I had the strength, because if it turned out that it was my wife, and she were alive, and I prodded her, it would kill her."
Click here for Dave Barry's website
"We have the flu. I don't know if this particular strain has an official name, but if it does, it must be something like "Martian Death Flu." You may have had it yourself. The main symptom is that you wish you had another setting on your electric blanket, up past HIGH, that said ELECTROCUTION."
If you haven't ever read anything written by him you MUST!!!
 |
| Benny and Garcia |
So we played all 32 races 4 times each and kept track of the results. I made Benny keep a chart and add all the points. We ended up with a poster. I'm not sure exactly what method Benny was using for his charting purposes but I've convinced myself that it was educational. There was adding and writing and spelling and reading a chart. By the end of it I was feeling pretty impressed with myself.
Benny is already talking about next year's "Grudge Match". He tells me that there is always the chance that I could do a little better if I practice a little harder.
So I guess the take away in all of this is that things don't have to go as planned always. As long as you show up your kids are going to appreciate it. Also, flu shots don't do anything.
One more Dave Barry quote. Just because I can.
"There has been a mound of blankets on my wife's side of the bed for several days now, absolutely motionless except that it makes occasional efforts to spit into a Kleenex. I think it might be my wife, but the only way to tell for sure would be to prod it, which I wouldn't do even if I had the strength, because if it turned out that it was my wife, and she were alive, and I prodded her, it would kill her."
Click here for Dave Barry's website
Labels:
activity,
chart,
dave barry,
family,
flu,
fun,
kids,
mario,
mario kart,
sick,
vacation,
video games
Saturday, January 5, 2013
Mmmmmmm..... Yarn.....
One of the moms from work apparently has a bad habit of starting projects with the best intentions, investing money and then not following through. While I TOTALLY understand that problem I can also understand why her husband told her she had to get rid of some of her "projects".... especially considering that one of the unused items was a professionally installed kiln!! Knowing the back ground I was not at all surprised when her husband brought in a giant bag of yarn one day and told me that she was gifting it to me.
This happened right before I got sick so while I was laying in my bed the bag of yarn kept catching my eye until I finally just dumped it out on the bed so I could look at it and try to get an idea of what I wanted to make.
It kind of sucks that you can't see my toes in this picture because I seriously just laid in bed rolling the yarn into balls and looking at it. I know I'm crazy but yarn makes me happy. Also, throwing it into the basket became a game and one of my only means of entertainment. It's actually a pretty good time when you have a high fever.
I got to the point where my brain couldn't consider following a pattern or even doing something simple like a scarf but I really wanted to make something.
The more I looked at all the yarn, the more I realized I liked all of the different colors and textures together.
I remembered seeing a friend make a simple scarf that was nothing more than a lot of different strands held together with a piece of tied string. The simplicity of that was RIGHT up my alley.
Fairly quickly I put maybe 8 of them together.
I've been wearing one and I love it. I gave one to one of the teachers at work and one to my niece tonight. I love the idea of giving them all away.
I "signed up" for a pay it forward game on Facebook. Someone is sending me a gift and I am going to send 5 gifts out into the world with the expectation that those five people will give away their own gifts to five more people. I love that idea but I'm not sure whether or not I'm going to use these for that. There is just something nice about the idea of giving something to someone for absolutely no reason and with no expectations of reciprocation.
So no instructions needed.... Literally just cut yarn to whatever length you like, tie it together and you are done!
Maybe if you make one, you can make two and make someone smile.
Subscribe to:
Posts (Atom)


